[Live Lab] Streaming 101: Hands-On with Kafka & Flink | Secure Your Spot
Serverless Stream Processing with Apache Kafka, Azure Functions, and ksqlDB
Serverless stream processing with Apache Kafka® is a powerful yet often underutilized field. Microsoft’s Azure Functions, in combination with ksqlDB and Confluent’s sink connector, provide a powerful and easy-to-use set of tools that can handle even the most complex workloads. This blog post continues our coverage on serverless stream processing, building off of a previous post of this series that covered similar AWS-based solutions. This time, no AWS—only Microsoft Azure.
This blog post builds an application that integrates ksqlDB and Azure Functions, using the best functions of each to really lean into the strengths of both. One of the solutions leverages Kafka Connect to trigger Azure Functions—the other solution does not. The trade-offs between the two options are examined to help you select the one that is best for you. But before we get into the nuts and bolts, let’s take a quick look at the tools at our disposal.
ksqlDB
ksqlDB is a database that’s purpose-built for streaming applications. It allows you to develop an application that will respond immediately to events that stream into a Kafka cluster. It provides the ability to take a “no-code” approach by leveraging something you may already be familiar with: SQL. For example, you can do stateless event stream processing:
CREATE STREAM locations AS
  SELECT rideId, latitude, longitude,
         GEO_DISTANCE(latitude, longitude,
                      dstLatitude, dstLongitude, ‘km’
                      ) AS kmToDst
 FROM geoEvents
ksqlDB also allows you to do stateful processing. For example, if you take the stream example from above, you can create a table to track longer train rides over 10 kilometers.
CREATE TABLE RIDES_OVER_10K AS
    SELECT rideId,
           COUNT(*) AS LONG_RIDES
    FROM LOCATIONS
    WHERE kmToDst > 10
    GROUP BY rideId
This blog uses ksqlDB queries like the previous two examples, relying on its high scalability and serverless capabilities, to complete the integration discussed in this blog. The events emitted by the ksqlDB queries will be used to invoke the Azure Function instances.
Azure Functions
Microsoft’s Azure Functions provide the Function as a Service (FaaS) component of the work discussed later in this blog. Azure Functions accelerate serverless application development, making it easy to process and react to events. It’s an event-driven on-demand serverless compute platform that scales automatically while providing an end-to-end development experience.
There are two main options for integrating a ksqlDB application with Azure Functions: First, triggering functions using the Confluent Azure Function sink connector, and second, triggering functions using the Azure Function Kafka extension. Azure Function’s Kafka extension is now generally available, enabling customers to detect and respond to real-time messages streaming into Kafka topics or write to a Kafka topic through the output binding. You can simply focus on your Azure Function’s logic without worrying about the event-sourcing pipeline or maintaining infrastructure to host the extension.
Connectors
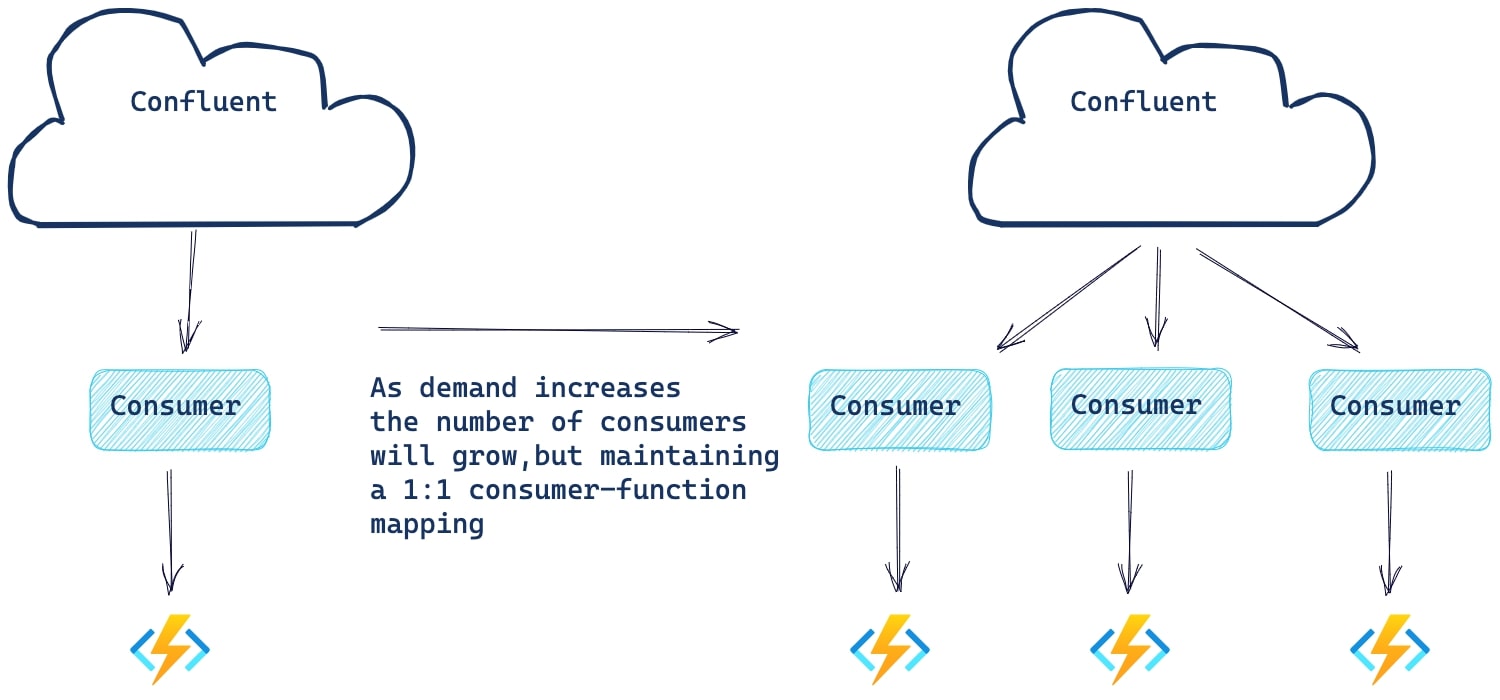
Connectors provide a mechanism for integrating streaming data between a Kafka cluster and an external application. In this example, we use the Azure Function sink connector to directly trigger Azure Function invocations. The following illustration shows the Confluent Azure sink connector consuming events from Kafka, then executing the Azure Function invocations to execute business logic:

End goal: A working serverless example
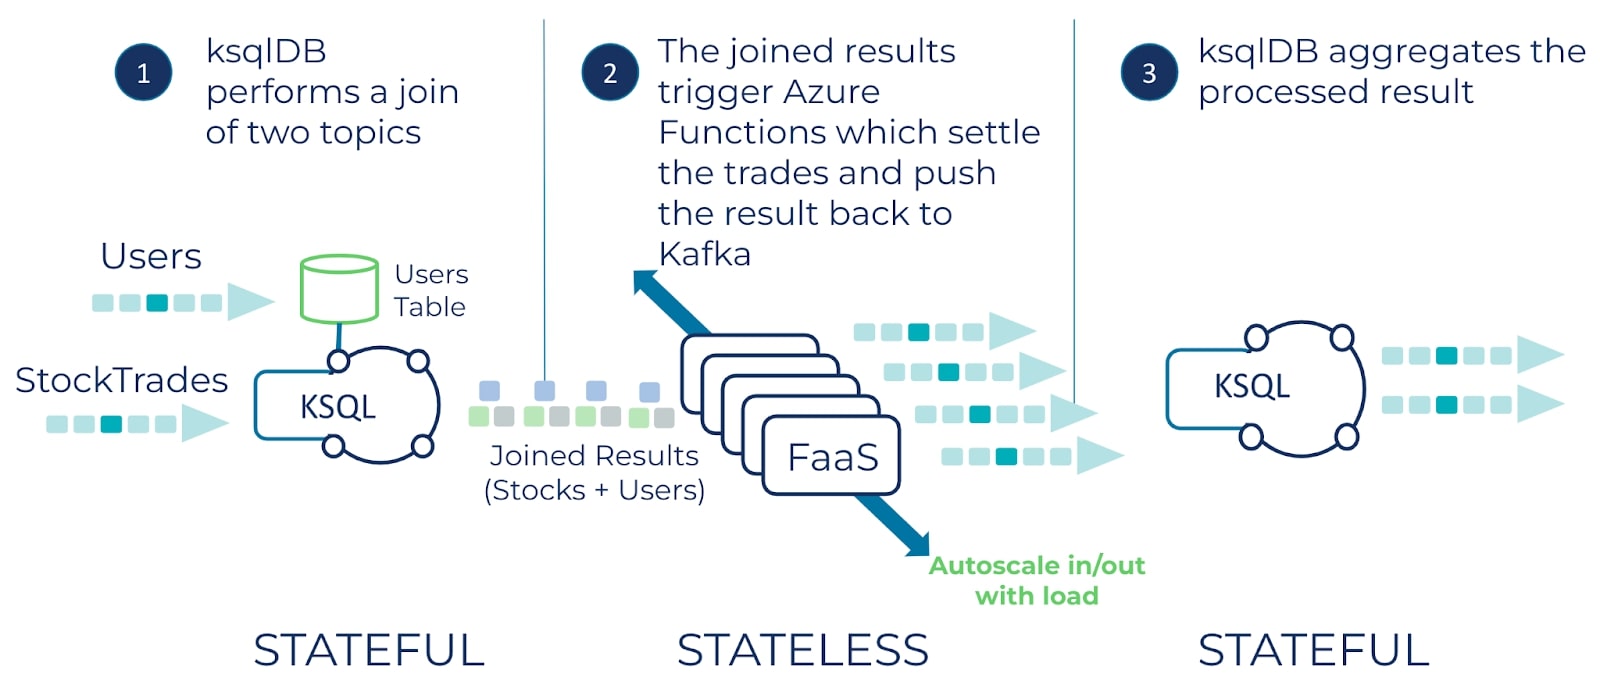
This GitHub repository contains a complete end-to-end example of integrating ksqlDB with an Azure Function for a complete serverless application. ksqlDB performs a join between a stream of stock trades and a table of users and writes the result to a Kafka topic. Next, the Azure Function processes the result and writes its output to a topic on Confluent Cloud. Finally, ksqlDB executes long-running stateful queries to analyze the results of the Azure Function output.
In this example Azure Functions, ksqlDB, and Kafka each play to their strengths. Azure Functions provides stateless compute that quickly scales with load, while ksqlDB provides the long-running apparatus for joins and durable and stateful compute. Finally, Kafka stitches it all together by providing real-time event streams to connect each component.
The flow of the application is captured in this diagram:

A quick review of serverless concepts
Serverless code is invoked in response to an event, such as consuming from a Kafka topic. The goal of serverless architectures is to eliminate the concerns of deploying, hosting, and managing infrastructure, and instead focus on developing and running the business logic.
Function as a Service
Function as a Service (FaaS) allows you to execute specific business logic, as a serverless function, in response to an event. Upon consuming a new event, the FaaS provider invokes the function and applies the business logic to the event. A function invocation can also process a batch of events during its execution window, significantly increasing its throughput. FaaS solutions are also extremely scalable, providing the ability to go from zero instances to 100 or more depending on the options provided by your cloud service provider. FaaS providers traditionally pair this execution model with a “pay-as-you-go” billing model, making it even more attractive to workloads that run only intermittently.
Stateless and stateful processing
Stateless operations are one form of serverless business logic and are usually relatively simple as they don’t need to maintain any state beyond the lifespan of the function call. All data necessary to process the event is contained within the event itself. For example, consider the Predicate interface in Java. The invocation of the method Predicate.test(String value) returns true or false based on a given condition like value.equals(“success”).
There are, however, use cases that require information about previous events—for these, you need state. Stateful processing involves maintaining state between function calls, including previously processed events and ongoing aggregations. Maintaining state becomes much more common as the complexity of the application grows, so it’s important to use a serverless platform that makes this as simple as possible. ksqlDB is a prime example of a serverless solution that supports easy stateful processing use cases.
The following dives into the specific steps to build the demo application.
Creating the Azure Function sink connector
For this demo application, we use a sink connector to push the stateful join results to an Azure Function. But there’s one important part of building our stateful-stateless integration application to note: ksqlDB now supports issuing statements to create sink or source connectors via a query issued by the REST API. The impact of this means that you can create the necessary integration parts of an event streaming application with a SQL-like statement, which you can store in version control along with the SQL queries that you use to run the application on Confluent. For example, the statement to create the connector looks like this:
CREATE SINK CONNECTOR `azure-function-connector` WITH(
    "topics" = 'user_trades',
    "input.data.format" = 'PROTOBUF',
    "connector.class" = 'AzureFunctionsSink',
    "name" = 'AzureKsqlDBIntegrationConnector',
    // Some details left out for clarity
...
Azure Function sink connector details
Let’s take a few minutes to discuss how the sink connector works under the covers. This is a high-level discussion and does not cover every aspect of the sink connectors’ behavior, but should help you configure it for your own use cases.
Once a task receives a collection of records to submit to the Azure Function, it first groups them by topic partition. For example, if you have a topic “user-trades” with six partitions then you’ll end up with a map with keys like so:
- “user-trades-0” : List
- “user-trades-1”: List
- “user-trades-N: List
Then each group of records are passed along to an HTTP client. Depending on the number of records, the client will “chunk” the list into sub-lists, determined by the max.batch.size configuration value. Then the client submits an asynchronous POST request to the function endpoint and stores a returned Future object. What happens next depends on the configuration of the max.pending.requests. The default value is 1, so the sink connector will not issue another POST request until the current one is successfully processed. Otherwise, the connector issues requests concurrently up to the value of the max.pending.requests configuration.
So the question is what value to use for max.tasks and max.outstanding.requests? That depends on the processing order guarantees you need. With a max number of tasks and maximum number of requests set to one, you are guaranteed in-order processing for each batch, with a trade-off of lower throughput. However, if you don’t need order processing guarantees, then setting the number of tasks to match the partition count and increasing the number of outstanding requests to something higher than one makes sense.
What does increasing the number of tasks to a number higher than one do to the processing order guarantees? Remember, the Azure Function works on demand, so you have no control over how many instances there are. So if one function can handle the requests from multiple tasks, you’ll most likely end up with interleaved batches processed.
The Azure Function runtime can spin up or take down instances as needed. Therefore, with multiple tasks, you can’t be guaranteed that each one will issue requests to its “own” instance, it may be handling requests from multiple sources.
Responding to events
For responding to the events sent to the sink function, you need to implement the Confluent .NET producer inside your Azure Function code. The conditions for using a Kafka producer inside the function code are the same whether you’ve deployed Azure Functions for use with the sink connector or with the direct triggering approach, so we’ll defer the discussion of using the embedded producer until the next section.
The next section focuses on the second option for integrating Azure and Confluent: the Azure Functions Kafka extension.
Azure Function Kafka extension
The Azure Functions Kafka extension lets you use a Kafka topic as a direct event source for your Azure Function. To enable it for your Azure Function application, you need to add the Microsoft.Azure.WebJobs.Extensions.Kafka dependency. The current version as of this blog is 3.4.0. You can consult the nuget package manager tool for the different methods of getting the dependency into your application.
Using the Function extension
To use the extension in your function code and enable a Kafka topic as an event source, you need to add a .NET attribute named KafkaTrigger and some configurations needed to connect the underlying consumer to Confluent Cloud:
[FunctionName("AzureKafkaDirectFunction")]
    public static void KafkaTopicTrigger(
        [KafkaTrigger("%bootstrap-servers%",
            InputTopic,
            AuthenticationMode = BrokerAuthenticationMode.Plain,
            ConsumerGroup = "azure-consumer",
            LagThreshold = 500,
            Password = "%sasl-password%",
            Protocol = BrokerProtocol.SaslSsl,
            Username = "%sasl-username%")]
        KafkaEventData<string, byte[]>[] incomingKafkaEvents,
        ILogger logger)
Here you may notice that some of the necessary configurations are surrounded by a % character, enabling configuration replacements executed at runtime.
The following offers a quick review of some of the key parameters.
Bootstrap-servers
The bootstrap-servers configuration needs to be dynamic to reflect the cluster IP address; hence you don’t want that hard-coded. The other configurations are sensitive, so you want to encrypt them and have the application securely retrieve the values when the function is starting. Securing configurations is discussed in an upcoming section.
LagThreshold
The LagThreshold parameter defines how much consumer lag you’ll accept before Azure will spawn another function instance new consumer instance, triggering a rebalance in an attempt to catch up on the lag in offsets.
KafkaEventData
The KafkaEventData parameter provides some “configuration by convention” that we should discuss. As shown in this code sample KafkaEventData is C# array type, which will contain the number of records declared by the maxBatchSize configuration (default 60t). However, if you declare the parameter to the function as single type KafkaEventData<K,V> incomingKafkaEvent, then it executes only on a single record.
The generics for KafkaEventData represent the types for the key and value of the incoming Kafka records. The Azure Function Kafka extension (when using C#) supports deserializing Avro, Protobuf, and string formats out of the box.
Since we’re using Schema Registry to serialize records, you need to use it to deserialize them. But the Azure Function’s embedded deserializers aren’t “aware” of Schema Registry, so you need to do it in your code.
First, specify the value parameter type of the KafkaEventData as a byte array—byte[]—so the records arrive in your function code as-is. Then you deserialize them in the following way:
_protoDeserializer = new ProtobufDeserializer().AsSyncOverAsync();
Note that we’re using the AsSyncOverAsync method here since the function executes in a synchronous context.
Responding to events
Once we’ve completed the back-end processing we need to write the result back to a Kafka topic. In the previous blog post AWS Lambda example we used an embedded KafkaProducer to write to the topic. With our Azure-based solution we can do exactly the same thing: declare the KafkaProducer as a static field on the function class and instantiate it in a static block or, in this case, a static constructor since we’re using .NET.
The Azure Kafka function extension also provides an output binding which allows a Functions app to write messages to a Kafka topic, removing the need to provide a KafkaProducer in the function code:
[Kafka("%bootstrap-servers%",
  OutputTopic,
  Protocol = BrokerProtocol.SaslSsl,
  AuthenticationMode = BrokerAuthenticationMode.Plain,
  Username = "%sasl-username%",
  Password = "%sasl-password%")]
IAsyncCollector<KafkaEventData<string, byte[]>> outgoingKafkaEvents,
Using the Kafka attribute allows you to simply place completed records (serialized using the Confluent ProtobufSerializer in conjunction with the Schema Registry). Using this attribute simplifies your function from the standpoint that you don’t need to have any Kafka-specific code, aside from the (de)serializer. You simply process the delivered events and pass them to the outgoingKafkaEvents.AddAsync(eventData) method which handles the production of records back to Kafka.
Using the output binding comes with a trade-off in performance when compared to directly instantiating a .NET KafkaProducer. With some rough benchmarking that compares the throughput of the self-provided producer versus the one provided by the output binding, instantiating your own producer proved to be more performant. So you need to weigh the benefits of both approaches to determine what’s best for your current needs. The gap in performance in the output binding producer is under investigation and should be addressed soon. But taking everything into consideration, the output binding presents a great opportunity for faster, simpler development and deployment.
Configuration
Configuring the function extension and the KafkaProducer to communicate with Confluent Cloud requires some consideration as these settings are sensitive, and data must be protected appropriately. Once safely stored, you need a mechanism to efficiently access those configurations within your function code.
For storing sensitive configurations, you can use the Azure Key Vault. You can store single key-value entries as well as JSON composed of multiple key-value pairs. You can access the key-values from the vault by first configuring the application settings for your deployed Azure Function application. For example, the following looks at how you’d store and obtain the credentials for the Schema Registry configuration:
- Store a JSON file in the key-vault with the name schema-registry-configs:
{
"schema.registry.basic.auth.credentials.source" : "USER_INFO",
"schema.registry.basic.auth.user.info" : "xxxUSERNAMExxx:zzzSecretzzz",
"schema.registry.url" : "https://.azure.confluent.cloud"
}
- Then configure the application settings to access this at runtime:
ccloud-schema-registry = @Microsoft.KeyVault(SecretUri=https://.vault.azure.net/secrets/schema-registry-configs
- Retrieve the configuration value programmatically with something like this:
var schemaConfigs = Environment.GetEnvironmentVariable("ccloud-schema-registry");
This example will dynamically pull the latest version for a given secret, though you can also use the version number generated at the time you stored it. Note that the reference application for this blog has scripts that do all the key-vault and application settings work for you.
Configuring the KafkaTrigger attribute requires all arguments to be a constant expression. For example, a variable declared as a const string works or setting the attribute to a string literal works as well, but you definitely can’t do either of these with sensitive configurations. So the approach to supply the name of the variable as it’s configured in the application settings surrounded by “%” symbols looks like this:
[KafkaTrigger("%bootstrap-servers%",
    ...other configs left out for clarity
    Username = "%sasl-username%",
    Password = "%sasl-password%")]
Upon loading the function, the platform will look in the application settings for any configurations with the name in between the “%” symbols. The platform will replace it with the value found in the app settings, and in this case, it will follow the reference to the value stored in the key vault.

Since the function extension leverages the Confluent.Kafka .NET library, there are a few configurations that are exposed for you to set in the host.json file. For example, you can directly control the size of batches with the maxBatchSize configuration covered earlier in this blog. There are more advanced configurations available for controlling the underlying librdkafka client(s) of the function extension.
One additional configuration to consider is runtime scaling. For the Azure Kafka Function extension you need to explicitly enable runtime scaling. You can do this either with the Azure CLI:
az resource update --resource-group  \
                   --name /config/web --set properties.functionsRuntimeScaleMonitoringEnabled=1 \
                   --resource-type Microsoft.Web/sites
Or through the Azure portal:

In the sample application that accompanies this blog, the runtime scaling is automatically enabled with the script that builds and deploys the function app for the Azure Kafka extension.
Azure Function plans
Currently, depending on the type of Azure Function you employ, there are different plans available from Azure. If you use a HttpTrigger type function as you would with the Azure Sink Connector, you need the consumption plan which follows the typical approach where charges only accrue with function invocations. But regardless of the trigger, there’s a lot to consider when choosing the correct consumption plan, so it’s best to closely review the plan overview in the Microsoft documentation.
For the Azure Kafka Function extension, you need to use the premium plan. The most significant difference between the plans is that with the premium plan, you have backup instances ready to go,which eliminates any cold-start issues.
Performance considerations

The Azure Function extension monitors the progress of the underlying consumer. Should the consumer lag exceed the configured LagThreshold (1000 by default), Azure will create a new consumer and function instance to help handle the load. Note that the maximum number of consumers equals the number of partitions in the topic.
In the case of the Azure Function used by the Azure Sink Connector, it uses a scale controller to determine when to scale out a new instance, determined in part by the rate of events. Each trigger type has its heuristics for deciding when to scale out or in.
Scaling limits
There are different scaling limits depending on the function plan and the operating system (OS). Under the consumption plan each function can scale out to 200 instances, while on the premium plan, the limit is set at 100 function instances. The OS you use also determines the function scale limit, for the specific numbers consult the scale documentation.
To test the Azure Kafka Function extension scaling, we performed a similar experiment to what we did in the previous blog.
To force increasing horizontal scaling, we made changes to Azure Function by first setting the batch size to 1 (definitely not a production value!) and adding an artificial wait of 5 seconds to the method handler code. These values were selected to simulate a high instance workload without having to produce (and consume) billions of records. For our event data, we produced 5M records to a topic of 100 partitions, ensuring an even distribution of 50K records per partition.
After starting the Azure Function, one consumer was responsible for all 100 partitions. But at a rate of one record every five seconds (the maximum throughput achievable for our workload within a single thread). At that level of progress, the lag quickly grew to the point that forced the Azure Function to rebalance and start another consumer/function pair. The evaluation of the consumer lag occurred roughly every 30 seconds with an accompanying rebalance since the lag continued to increase. At that rate we had 100 Azure Function instances (the maximum) in approximately 50 minutes.
Delivery guarantees
Currently, when working with the Azure Kafka function extension, you need to provide all error handling and subsequent retries within your function code. The Azure extension does not offer retries of a failed function execution, but it always commits offsets even when the function throws a runtime execution error. Offsets are also committed even after a processing timeout exception, so you must ensure that the entire batch of events can be processed during that time window otherwise you risk missing events. Consequently, Azure Kafka Function extension can offer only at-most-once processing guarantees.
Conclusion
Now that you’ve learned how combining ksqlDB and Azure Functions gives you a powerful, serverless one-two punch, it’s time to learn more about building your own serverless applications. Check out the free ksqlDB introduction course and the inside ksqlDB course on Confluent Developer to get started building a serverless event streaming application on Confluent Cloud.
Related content
- Listen to the serverless stream processing podcast featuring Bill Bejeck on the Streaming Audio
- Read Azure Function documentation for a complete understanding of the Function landscape
- Learn more about building serverless data streaming applications on Confluent Developer
Avez-vous aimé cet article de blog ? Partagez-le !
Abonnez-vous au blog Confluent
How to Protect PII in Apache Kafka® With Schema Registry and Data Contracts
Protect sensitive data with Data Contracts using Confluent Schema Registry.
Confluent Deepens India Commitment With Major Expansion on Jio Cloud
Confluent Cloud is expanding on Jio Cloud in India. New features include Public and Private Link networking, the new Jio India Central region for multi-region resilience, and streamlined procurement via Azure Marketplace. These features empower Indian businesses with high-performance data streaming.

