[Live Lab] Streaming 101: Hands-On with Kafka & Flink | Secure Your Spot
Confluent’s Oracle CDC Connector Now Supports Oracle Database 19c
Many Oracle Database customers currently still leverage Oracle 12c or 18c in their production environments, with some even using Oracle 11g. Most of these customers have moved to 19c or plan to move to 19c in the near future because the Premier Support ended for 12c in November 2020 and for 18c in June 2021. Since Confluent released the first GA version of the Oracle CDC Source Premium Connector in February 2021, adding Oracle 19c support has been a priority. We are very excited to announce that our Oracle CDC Source Connector v1.3.0 now supports Oracle 19c!
We have used the “continuous_mine” option in LogMiner to read a redo log from Oracle Database. This feature simplifies how the connector interacts with Oracle Database and it has been working well with Oracle 11g, 12c, and 18c. However, as the “continuous_mine” option for the “dbms_logmnr.start_logmnr package” is desupported in Oracle Database 19c (19.1) and no longer available, we need to find a way to provide a similar CDC capability via LogMiner without the “continuous_mine” option. While we continue to rely on LogMiner for 19c, the connector makes an intelligent decision on when it needs to mine online logs and archived logs. The difference is that with continuous mine the connector would generally issue one query and spend long periods of time reading and processing results, whereas without continuous mine the connector would loop repeatedly around querying and processing results.
Another challenge we needed to overcome was how to handle a DDL statement like ALTER TABLE CUSTOMERS ADD country VARCHAR(100);. Previously, we only relied on Online Catalog. Online Catalog has worked well in most cases but fell short when the connector needs to process records based on an old schema. This is problematic because Online Catalog only holds the latest schema. We needed a way to address records based on an old schema and records based on a new schema.
When the connector v1.3.0 or above is configured to run against Oracle 19c, the connector instructs LogMiner to look for a dictionary in Online Catalog by default. When a DDL statement is detected, the connector automatically instructs LogMiner to find a LogMiner dictionary in the archived log files, making it possible for LogMiner to handle DDL statements. One caveat here is that there is considerable latency from when records show up in online redo log files to when they graduate from online redo log files into archived redo log files. In order to reduce the latency, you might choose to extract the LogMiner dictionary to redo log files.
Users can change the behavior of the connector by setting “oracle.dictionary.mode”.
- auto (default): The connector uses the dictionary from the online catalog until a table-altering DDL is encountered. At which point, the connector starts using the dictionary from archived redo logs. Once the DDL statement has been processed, the connector reverts to using the online catalog. Use this mode if DDL statements are expected.
- online: The connector always uses the online dictionary catalog. Use online mode if no DDL statements are expected as DDL statements aren’t supported in online mode.
- redo_log: The connector always uses the dictionary catalog from archived redo logs. Use this mode if you can not access the online redo log.
When “oracle.dictionary.mode” is set to either “auto” or “redo_log”, DBA will need to follow the following steps for the connector to properly address a DDL change.
- Rebuild the dictionary in the database by running the following command:
EXECUTE DBMS_LOGMNR_D.BUILD(OPTIONS=>DBMS_LOGMNR_D.STORE_IN_REDO_LOGS);
- Perform a DDL change (for example ALTER TABLE CUSTOMERS ADD CITY VARCHAR(50); )
- Run the following command to rebuild the dictionary:
EXECUTE DBMS_LOGMNR_D.BUILD(OPTIONS=>DBMS_LOGMNR_D.STORE_IN_REDO_LOGS);
Confluent’s Oracle CDC Connector in action
Let’s look at how you can create a CDC pipeline between Oracle Database and Azure Synapse Analytics with Confluent’s self-managed connector for the Oracle CDC Source and Confluent Cloud’s fully managed Azure Synapse Analytics Sink Connector. While this demo focuses on writing the data to Azure Synapse Analytics (SQL Pools), you can use the Oracle CDC Source Connector to write to other destinations like Snowflake, MongoDB Atlas, Google BigQuery, and Amazon Redshift as well.
Using Oracle CDC Source
You can run the connector with a Kafka Connect cluster that connects to a self-managed Apache Kafka® cluster, or you can run it with Confluent Cloud.
For this example, we’re using a Kafka cluster running on Azure in Confluent Cloud. You can follow the steps outlined in the Oracle CDC Source Premium Connector is Now Generally Available blog post to run a self-managed Oracle CDC Source Connector against Confluent Cloud.
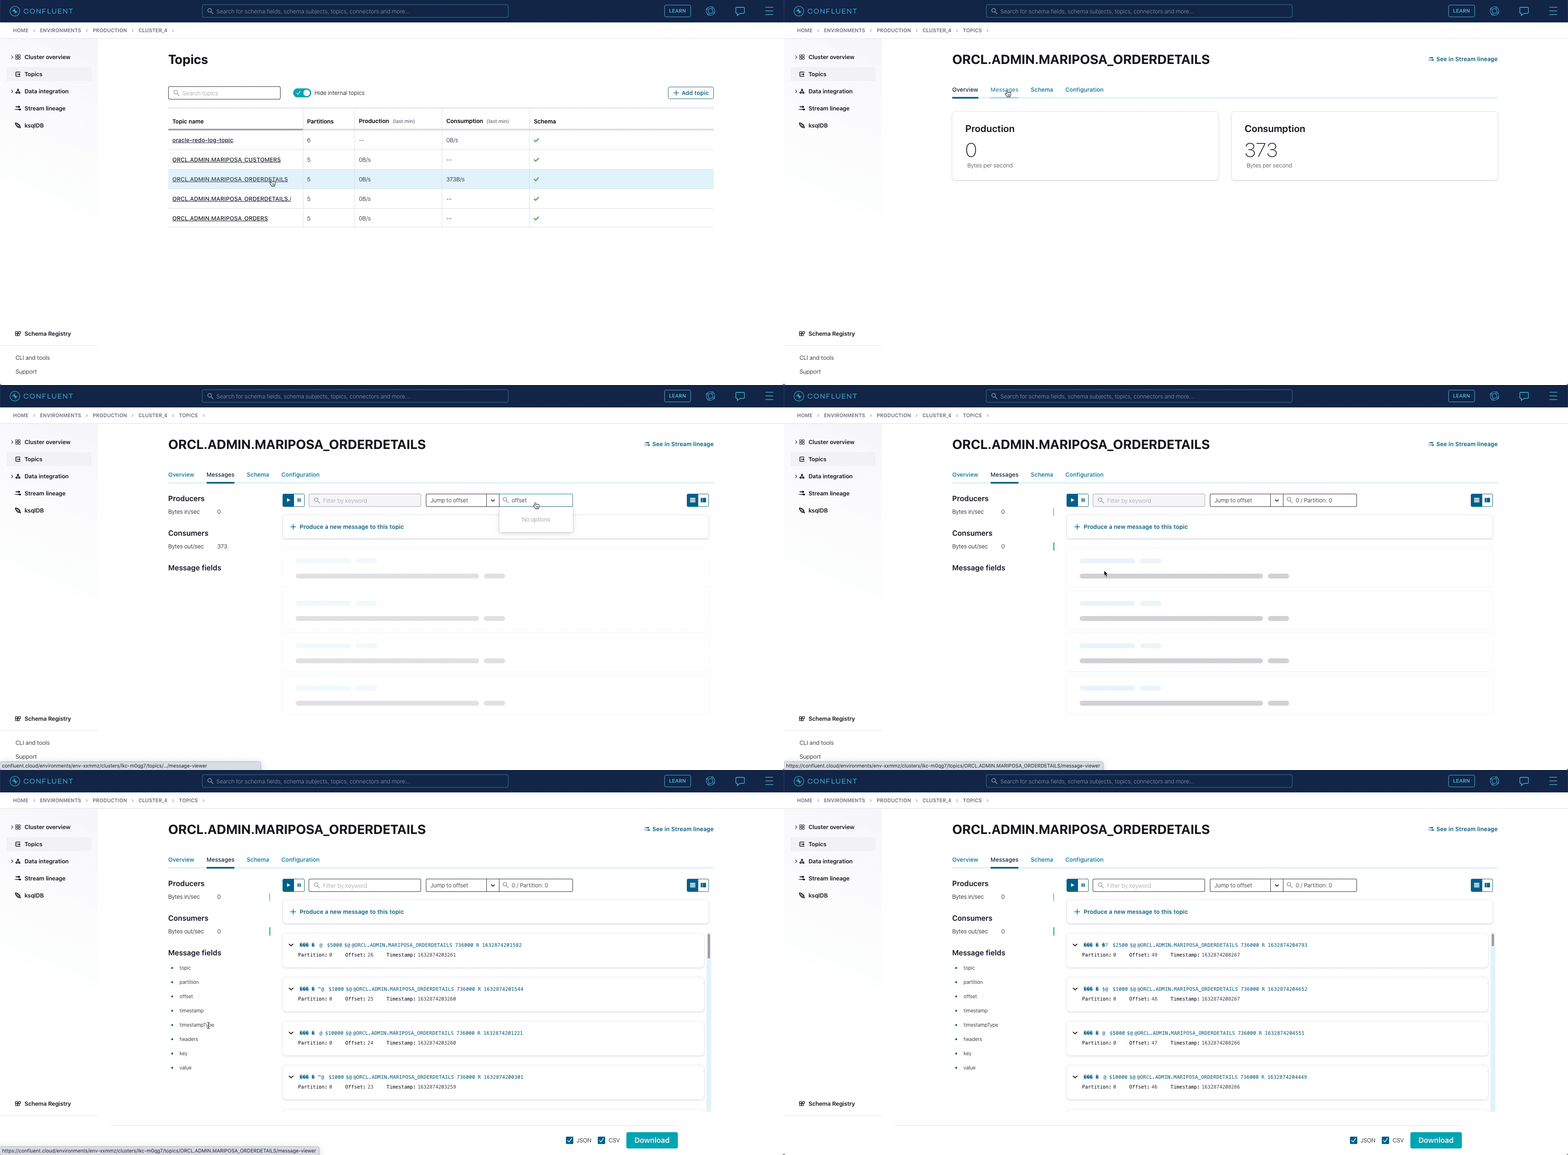
Once the connector is running, as new records are coming to the Oracle tables MARIPOSA_CUSTOMERS, MARIPOSA_ORDERS, and MARIPOSA_ORDERDETAILS, the connector captures raw Oracle events in the oracle-redo-log-topic and writes the change events to table-specific topics.
- MARIPOSA_CUSTOMERS writes to ORCL.ADMIN.MARIPOSA_CUSTOMERS
- MARIPOSA_ORDERS writes to ORCL.ADMIN.MARIPOSA_ORDERS
- MARIPOSA_ORDERDETAILS writes to ORCL.ADMIN.MARIPOSA_ORDERDETAILS

In the MARIPOSA_ORDERDETAILS table, we realize that adding a ZIP code could be beneficial, so our DBA executes the following commands against Oracle 19c.
EXECUTE DBMS_LOGMNR_D.BUILD(OPTIONS=>DBMS_LOGMNR_D.STORE_IN_REDO_LOGS);
ALTER TABLE MARIPOSA_ORDERDETAILS ADD ZIP_CODE VARCHAR(10);
EXECUTE DBMS_LOGMNR_D.BUILD(OPTIONS=>DBMS_LOGMNR_D.STORE_IN_REDO_LOGS);
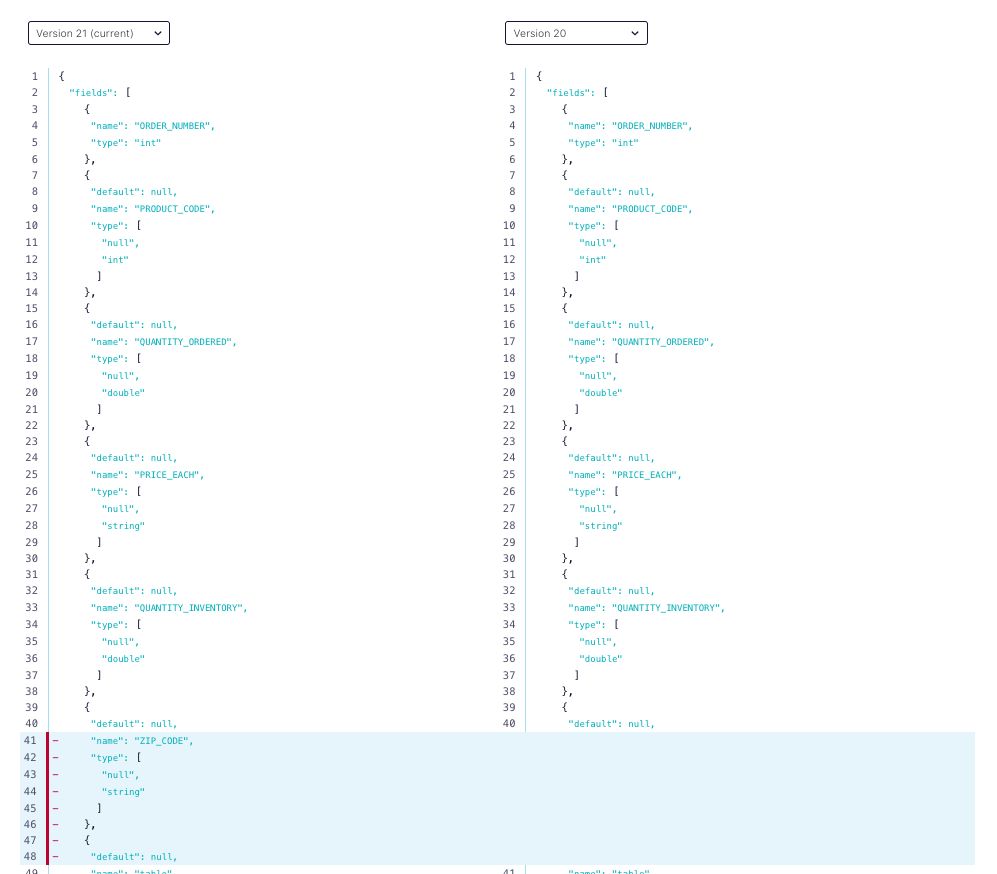
After the table is updated, new records with a ZIP code are inserted. As you can see below, the connector evolves a schema properly including zip_code.

Using Azure Synapse Analytics Sink
Now that we have streams of all of the data from the Oracle tables in Confluent Cloud, we can put it to use. In our scenario, we were required to send these records to Azure Synapse Analytics, and we’ll do that using the Azure Synapse Analytics Sink Connector. Azure Synapse Analytics consists of various components and the connector specifically interacts with Azure Synapse Analytics (SQL Pools). Once data is available in SQL Pools, users will be able to analyze data with other components in Azure Synapse Analytics. Because we’re using Confluent Cloud, we can take advantage of the fully managed connector to accomplish this.
As of this writing, the Azure Synapse Analytics and the Kafka cluster must be in the same region. Since the Kafka cluster used in this demo is running on Azure eastus, Azure Synapse Analytics (SQL Pools) is also created in eastus.
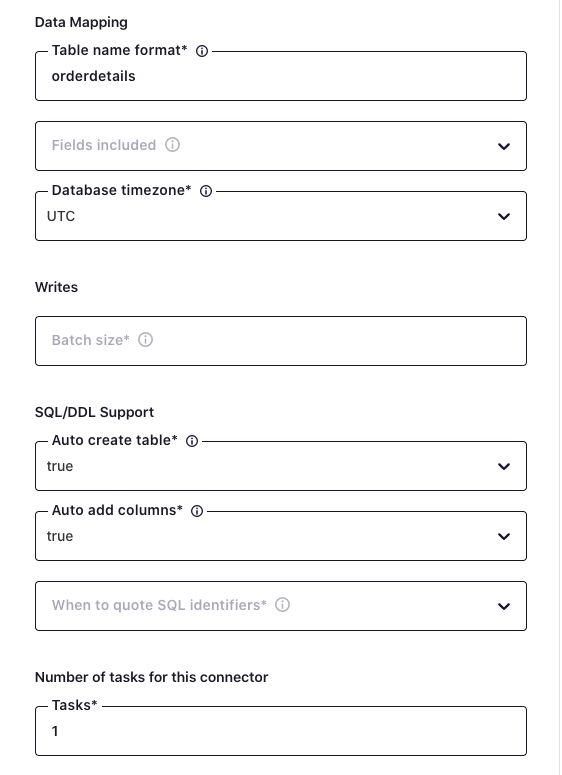
You can create a fully managed Azure Synapse Analytics Sink Connector with a few clicks. ORCL.ADMIN.MARIPOSA_ORDERDETAILS will be mapped to orderdetails in Azure Synapse Analytics (SQL Pools).

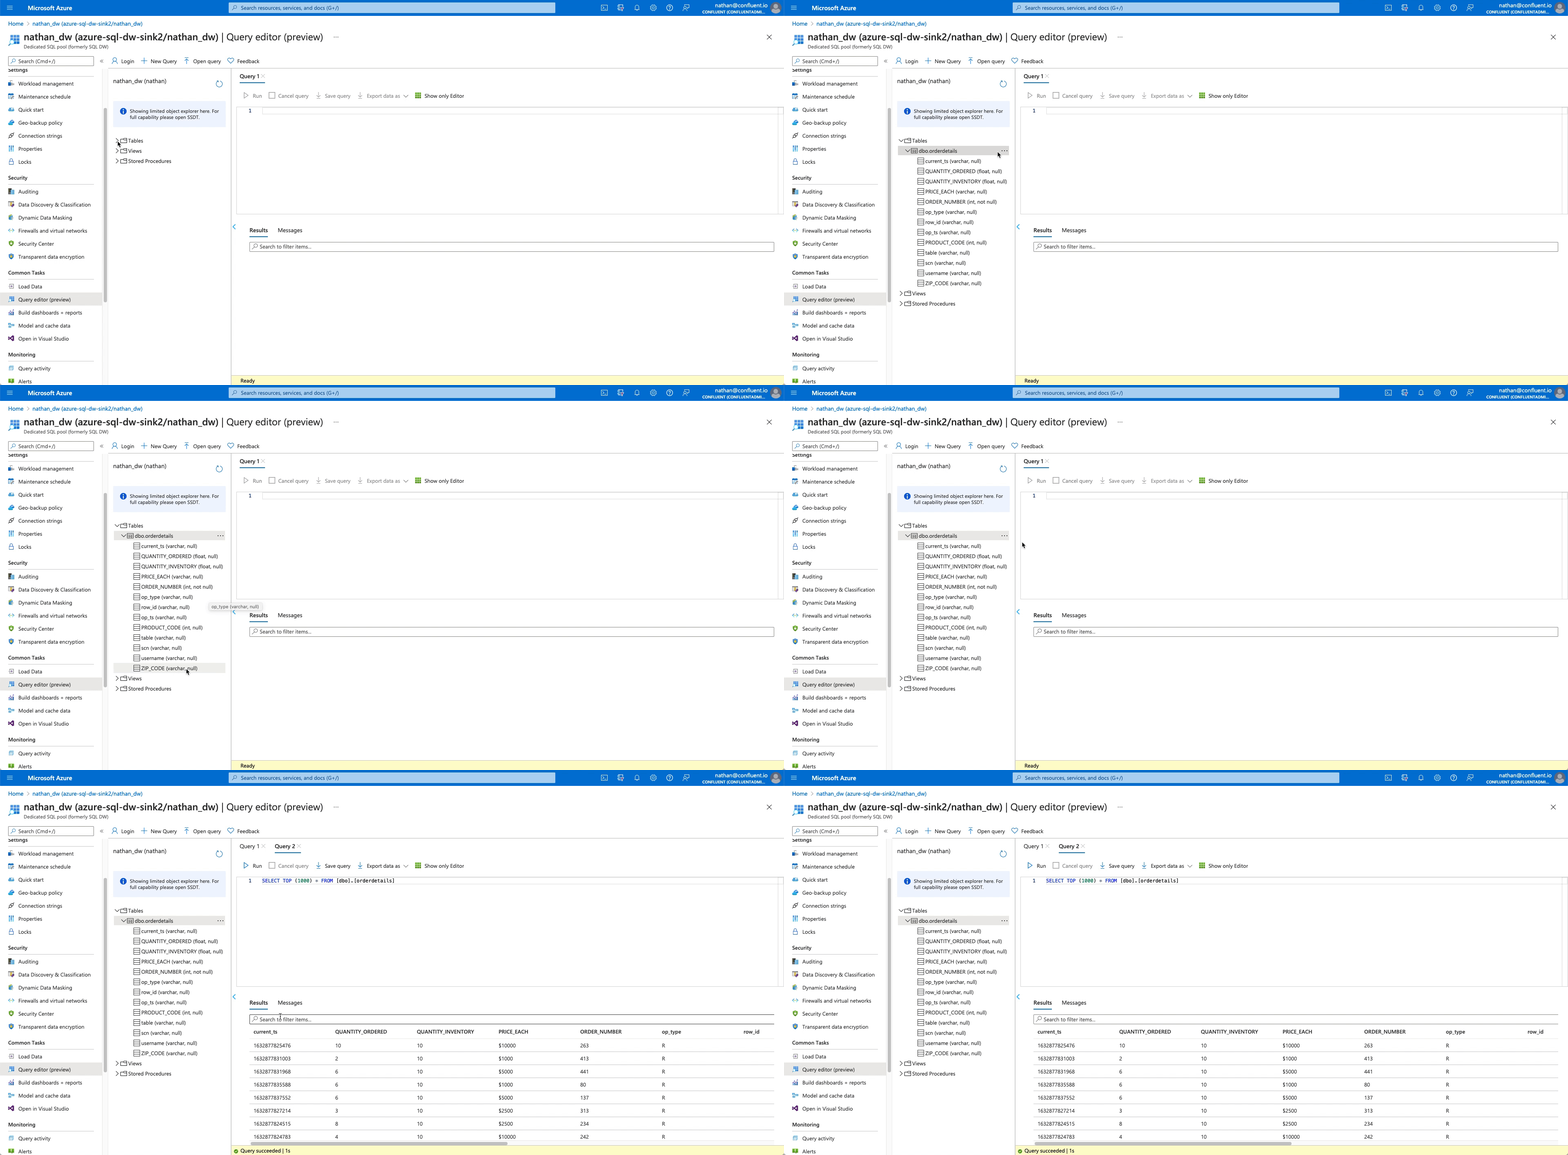
Heading over to Azure Synapse Analytics (SQL Pools), you’ll see the table called orderdetails, and the table is being populated with data.

You now have a working CDC pipeline from an Oracle database through to Azure Synapse Analytics using Confluent’s self-managed Oracle CDC Source Connector and fully managed Azure Synapse Analytics Sink Connector.
Learn more about the Oracle CDC Source Connector
If you haven’t tried it yet, check out Confluent’s latest Oracle CDC Source Connector on Confluent Hub or this Dockerized example to get familiar with various configuration parameters.
Further reading
Oracle CDC Source Premium Connector is Now Generally Available
Avez-vous aimé cet article de blog ? Partagez-le !
Abonnez-vous au blog Confluent
Empowering Customers: The Role of Confluent’s Trust Center
Learn how the Confluent Trust Center helps security and compliance teams accelerate due diligence, simplify audits, and gain confidence through transparency.
Unified Stream Manager: Manage and Monitor Apache Kafka® Across Environments
Unified Stream Manager is now GA! Bridge the gap between Confluent Platform and Confluent Cloud with a single pane of glass for hybrid data governance, end-to-end lineage, and observability.

